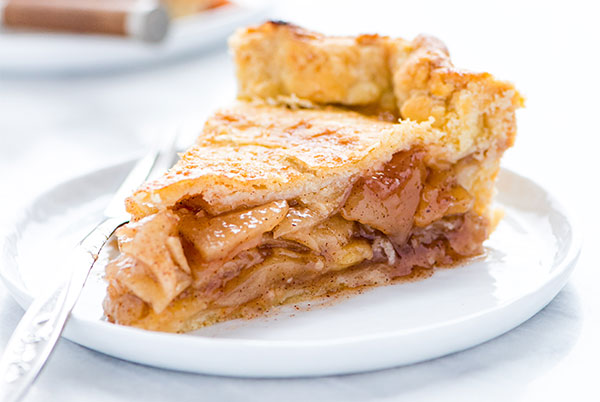
Gluten-Free Classic Apple Pie
This Gluten-Free Classic Apple Pie recipe is one of those tried-and-true desserts that will become a must-have part of your holiday meal.
Classic Apple Pie
Servings: 10
Calories: 380kcal
Ingredients
- 1 package double crust gluten-free pie crust mix (or use your favorite gluten-free pie crust dough recipe)
- 3 pounds apples , peeled and thinly sliced (see notes)
- 2 tablespoons (30 mL) fresh lemon juice
- ½ cup (100 g) granulated sugar
- ½ cup (110 g) light brown sugar, lightly packed
- ¼ cup (30 g) cornstarch or tapioca starch/flour
- 1½ teaspoons (4 g) ground cinnamon
- ½ teaspoon (1.2 g) ground nutmeg
- ¼ teaspoon (0.5 g) ground cloves
- ½ teaspoon (3 g) kosher or fine sea salt
- 1 large egg , room temperature
- 1 tablespoon (15 mL) cream or milk
- 2 tablespoons (30 g) unsalted butter, cubed and cold
- Coarse sugar , for garnish
Instructions
- Make the gluten-free pie crust as directed and chill for 1 hour.
- To make the filling, place the thinly sliced apples in a large bowl and toss with the lemon juice.
- In a separate medium/small bowl, whisk together the granulated sugar, light brown sugar, cornstarch, cinnamon, nutmeg, cloves, and salt. Break down any lumps.
- Pour the sugar/spice mixture over the apples and gently mix well to coat all the apples, then set aside.
- In a small bowl, make the egg wash by beating the egg and whisking in the cream. Set aside until ready to use.
- Roll out ½ of the chilled crust and place it in a deep-dish pie plate, leaving enough crust as an overhang. Brush the bottom crust with egg wash, if desired.
- Layer the apples evenly in the crust instead of just pouring the apples in. Having flat layers of apples will help the pie keep its shape better and it will help prevent air pockets in the pie. Taking the time to layer the apples is a bit more tedious and time-consuming but worth the effort.
- Once the apples are layered, pour any excess liquid from the apple bowl over the apples and scatter the cubed butter on top of the apples.
- Roll out the top crust and carefully place the crust on top of the pie. Gently press the crust down on top of the apples so that it's resting directly on top of them. Press the crusts together and crimp the edges to seal the crust. Trim the excess crust before crimping, if needed (I usually don't need to).
- Preheat the oven to 450°F and place a rimmed baking sheet on the center rack while the oven is preheating. Reserve a piece of parchment paper or foil to fit the baking sheet to be used at the time of baking.
- Place the pie in the refrigerator and chill for 30-45 minutes before baking. This will help the butter in the crust get cold to make a flaky crust once baked.
- Once the pie has chilled, remove it from the fridge and brush the top of the pie and the crust with the egg wash. Use a sharp paring knife to cut several slits in the top of the pie for venting. Be sure to make the cuts deep enough to go through the crust and wide enough that they don't close. Sprinkle the pie with coarse sugar, if desired.
- Carefully place the parchment paper (or foil) on the preheated baking sheet and place the cold pie on top. Bake on the center rack at 450°F for 10 minutes.
- After 10 minutes, lower the temperature to 350°F and bake the pie for 45-80 minutes. Tent the pie with aluminum foil to prevent the crust from getting too brown, if needed.
- When the pie is done, the filling will be bubbling along the edges and in the vents, the apples will be soft when tested with a knife, and the internal temperature will be at least 175°F. For best results, the pie should be bubbling for at least 5-10 minutes before removing from the oven.
- Cool the pie on a wire rack for at least 4 hours before serving so the filling can set. Serve at room temperature or chill before serving.
Notes
Notes:
• For this pie, I used 4 medium Honeycrisp apples and 3 medium Golden Delicious apples. The number of apples you use will depend on the size, so stick to 3¼ - 3½ pounds (before peeling and coring), or about 8 cups when sliced.
• Juices from the pie may overflow, which is normal. Just make sure you're baking the pie on top of a rimmed baking sheet (as directed) to catch the juices and save the bottom of your oven.
• Baking time will vary by oven and type of apple used. Start checking your pie for doneness at 45 minutes and increase baking time as needed.
Nutrition
Nutrition Facts
Classic Apple Pie
Amount Per Serving
Calories 380
Calories from Fat 126
% Daily Value*
Fat 14g22%
Saturated Fat 5g25%
Trans Fat 1g
Polyunsaturated Fat 2g
Monounsaturated Fat 6g
Cholesterol 24mg8%
Sodium 292mg12%
Potassium 212mg6%
Carbohydrates 63g21%
Fiber 5g20%
Sugar 35g39%
Protein 3g6%
Vitamin A 191IU4%
Vitamin C 7mg8%
Calcium 33mg3%
Iron 1mg6%
* Percent Daily Values are based on a 2000 calorie diet.
This Gluten Free Apple Pie recipe can also be found on What The Fork Food Blog.
Disclaimer: All nutrition facts on Gluten Free & More are meant only as a guide and may differ depending on product brands used or ingredient substitutions. Some errors may occur, so you are encouraged to confirm the recipe’s ingredient and nutrition suitability for your own diet.
Have you tried this recipe? Give it a star rating and let us know your thoughts in the Ratings & Reviews section below.