
Gluten Free Easy, Easy, Easy! French Bread Recipe
Today is supposed to be a very lucky day – 11/11/11. And personally, I am inclined to believe it. It was lucky for me and I think lucky for you. I had a gluten free bread baking recipe breakthrough.
As a person who spends most of her time creating gluten free recipes you can imagine that I get my fair share of emails asking if I have a really good recipe for gluten free bread. Before going gluten free I made a few loaves of bread (with varying degrees of success) but I was by no means a bread baker. When I get these emails I think “Why ask me? Why not ask a bread baking expert?”
But the more I thought about it, the more I realized, I am probably the perfect person to ask. Why? Because:
1. I went for probably 15 years without eating bread so I know I can live without it – I would rather not eat bread than eat yucky, grainy, crumbly bread.
2. I love great food but I am also kind of lazy so I am always looking for the easiest way to make something.
3. I am not a person who finds it “relaxing” to knead dough by hand for 15 minutes. I wish I was that kind of person, but sadly when I do menial tasks for any period of time, my mind starts to wander and that is never a good thing!
4. I am success driven, persistent and some might even say a little OCD – I will keep at something until I get it right.
So, I decided to put my mind to making great gluten free breads. I decided to start with gluten free French Bread. I did my homework, I studied first the traditional French Bread recipes and methods, then I looked at gluten free ingredients and studied how to make them work better and finally, I baked and baked and baked!
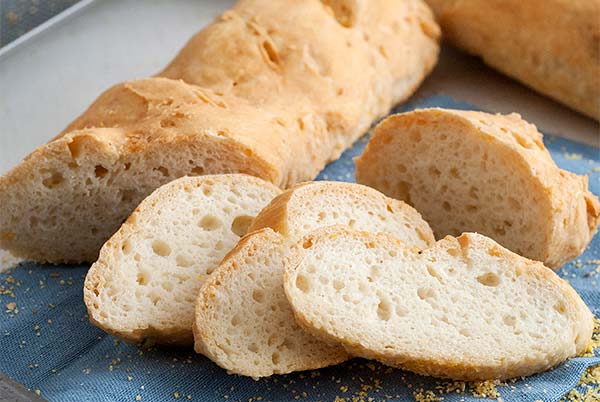
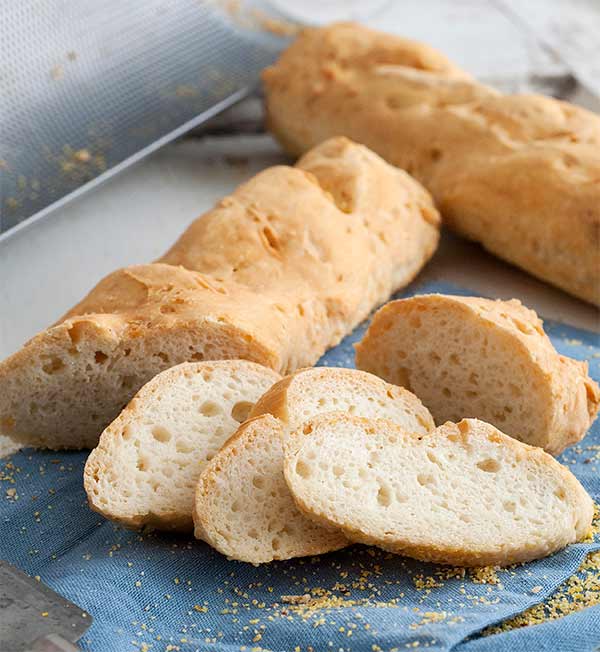
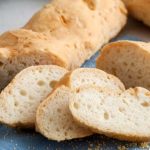
I played around with flours and baking times and methods until I got a gluten free French Bread recipe that was crunchy on the outside, tender on the inside, beautifully browned, tastes like what French Bread should taste like and was easy to make. I threw away a lot of bread, enlisted everyone I came across (including a good number of whom are regular gluten-eaters) in blind taste testing and finally, I am pleased to say, came up with a recipe I am happy with! And I think YOU will love!
And you want to hear the very best thing? It is actually EASIER to make gluten free French Bread than it is to make the gluten-filled kind! Yes, you heard right – EASIER! No kneading, no double rising (I tried, better without) no hours until bread is ready. You can actually have lovely, perfect gluten free French Bread in about an hour and a half, start to finish!
Ok… so here are some tips I discovered:
Equipment
You are going to need a mixer – it is going to do pretty much all the work for you. You also need a French bread pan – gluten free bread needs support when it is rising and baking. Fortunately, you can get one for under $20.00 – considering the cost of decent gluten free bread, an investment so worth it! The pans come either perforated or solid, I used both in testing and it didn’t make a huge difference but I did like the results from the perforated pans slightly more. And finally, unless you are dead certain your oven is totally accurate, run over to the hardware or grocery store and grab an oven thermometer for about 4 bucks – you should have one anyway!
Kneading
Remember when the internet was all abuzz about no-knead bread? Ha! That’s old news to us gluten free bakers! 3 minutes in the mixer and that’s pretty much it, no kneading what-so-ever!
Yeast
I got the best result from Dry Active Yeast. It needs to be “active” so if you have had a jar sitting in your fridge since you can’t remember when, go get a new one – it lasts about 6 months refrigerated, after that it may not be good any longer. If you do store your yeast in the fridge then it will take longer for the yeast to “proof.” You want the yeast mixture to pretty much double in size and be all foamy.
Flours
After testing all sorts of different flour combinations, what worked best was a simple combo of white rice flour, sweet rice flour (also called glutinous flour) and tapioca starch. I used all Asian flours (Erawan Brand) which are more finely milled and cost a fraction of the flours you get in the health food store. I also tested this recipe using my own flour and it came out really great (well…dahaaa!) and the dough was a tad easier to work with.
Gum and Fat
I found that mixing the xanthan gum with the fat (olive oil) before adding it to the batter made it work better. I wish I could tell you why, just trust me on this.
Prep
Get all your ingredients out, mix your yeast, blend the xanthan gum with the oil and lightly beat your eggs before you start to mix, it makes it easier. Do the steps in order as I give you in the recipe.
The Dough
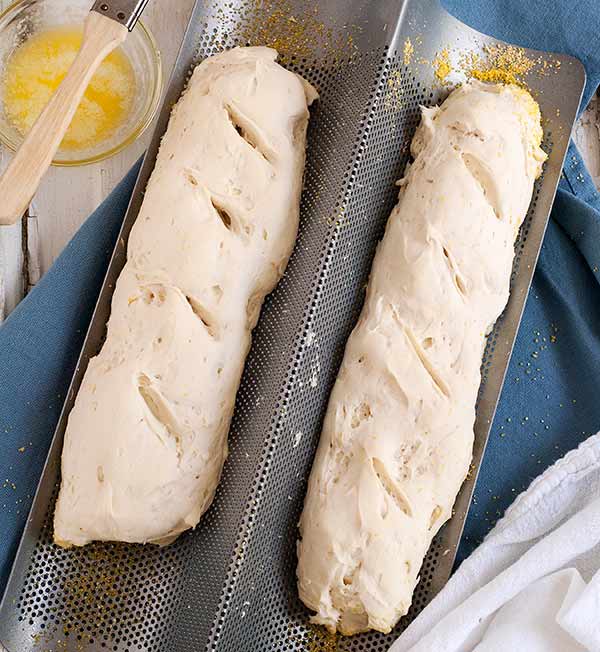
If you were used to bread making in a former pre-gluten-free life you will think there is not enough flour in the dough because it has a consistency more like a thick batter than dough. Resist with every fiber of your being from adding more flour! This is just the way gluten free bread dough is. You need to spoon the dough into the pans and shape it with a spatula – it won’t magically turn into pretty ovals unless you do this.
Slashing the Dough
Cutting 3 or 4 diagonal slashes into the top of the dough will help the steam escape while it is baking giving you a lovely, tender texture.
Prepping the Pans
Either spray your French Bread pans with gluten-free, non-stick cooking spray or brush with oil before putting the dough into the pans to rise. For a really authentic bottom, sprinkle a teaspoon of cornmeal on the bottom of the pans after you oil them up. It isn’t completely necessary but it does add that certain je ne se qua (fancy French term for “a certain something”). If using the perforated pans, place them on top of a baking sheet to oil and dust with cornmeal or you will have a mess to clean. Do not bake the bread on the baking sheet however, just put the French bread pan right on the oven rack.
Browning
I tested everything I could think of to get the perfect brown on the French Bread and what I found gave the best color came from brushing the loaves with melted butter just before baking. The good news is that they also came out beautifully browned with a brushing of melted Earth Balance as well – keeping the bread totally dairy free if need be.
Humidity
To get that crunchy crust and tender inside so characteristic of good French Bread it should bake in a humid environment. This is easily created by putting a pan of hot water into the oven while it preheats and just leaving it there while the bread is baking. You can also spritz the oven occasionally with water from a spray bottle but then you have to remember to do it whereas the pan of water just sits there and does its job.
Here’s how the whole thing goes:

Mix the yeast, sugar and warm water – whisk to dissolve.

Let the yeast “proof” until foamy and doubled in volume.

Get all your ingredients ready before mixing.

The dough will look more like batter than dough.

Grease the pan with oil and sprinkle with some cornmeal.

Spoon batter into pans, shape into ovals and slash the top 3 or 4 times.

Place a pan of hot water into the bottom of oven.
Gluten Free Easy, Easy, Easy! French Bread Recipe
Ingredients
- 2 tablespoons Dry Active Yeast
- 2 teaspoons sugar
- 1½ cups warm water it should be pretty warm to the touch but not hot
- 3 teaspoons xanthan gum
- 2 tablespoons olive oil
- 1½ cups super fine or Asian white rice flour*
- ½ cup superfine or Asian sweet rice flour*
- 1 cup tapioca starch*
- 1½ teaspoons kosher or fine sea salt
- 2 large eggs lightly beaten
- 1 teaspoon apple cider vinegar
- 2 teaspoons cornmeal optional
- 2 tablespoons butter or Earth Balance melted
Instructions
- Combine the yeast, sugar and warm water in a bowl about twice the size of the mixture and whisk to dissolve the sugar. Let sit for 5-6 minutes (10 if the yeast has been in the fridge) or until it is foamy and doubled in size.
- In a small bowl stir the xanthan gum with the olive oil until the xanthan gum is dissolved.
- Combine the flours, tapioca starch (or gluten free flour blend) and salt in the bowl of a mixer fitted with a whisk attachment (or just the regular beaters – don’t use a dough hook) and mix to combine. Add the yeast mixture, xanthan gum mixture, eggs and vinegar and mix on low to combine. Scrape down the sides of the bowl once. Turn the mixer to high and mix for 3 minutes.
- Spray a French bread pan (with 2 forms) with gluten-free, non-stick cooking spray or brush with more olive oil and sprinkle a teaspoon of cornmeal onto the bottom of each pan.
- Spoon the batter into the forms and shape into an oval with a spatula. Using a razor blade or sharp knife cut 3 or 4 diagonal slashes on top of each loaf. Cover the loaves with a clean kitchen towel and set in a warm, draft-free place to rise. Let rise for 30 minutes or until the loaves have doubled in size.
- Place a baking pan on the floor of your oven (or on the bottom shelf) and fill it with about an inch of really hot water. Position the rack you are baking the bread on in the middle of the oven. Turn the oven on and preheat to 400 degrees.
- Brush the top of the loaves with the melted butter or Earth Balance and bake for 40-45 minutes or until the loaves are golden brown and sound hollow when tapped. Let cool in the pan for 5 minutes then remove to a wire rack to finish cooling.
- You can also make crusty rolls by scooping the dough into 2 standard sized muffin tins, letting them rise 30 minutes and baking for about 20 minutes.
Notes
Nutrition
Shop This Post

The views and opinions expressed on this blog are purely the blog owner’s. This blog accepts free manufacturers’ samples and forms of cash advertising, sponsorship, paid insertions or other forms of compensation. Affiliate links may be included in this post.
Have you tried this recipe? Give it a star rating and let us know your thoughts in the Ratings & Reviews section below.


You had me at “Easy, Easy, Easy”! I must try this recipe!
haha! Yes, you must!
Those are beautiful and do not even look gluten free! They look normal! I can’t wait to try them, I’m always looking for gluten free recipes and dining to share on my site, thank you. :) Deborah
Thank you Deborah!
That bread looks fabulous, Carol! That’s one of the best homemade gluten-free breads I’ve seen – and it does look so easy. (I will say, though, I’ve never made the traditional, gluten-filled French bread. I actually have little experience in bread making.) Great work!
Thanks Zoe and trust me – it is easy!
I subbed the flours for 3 cups gluten free flour and my dough/batter was runny and spread. I had to block off the ends of the pan so it didn’t run everywhere. We will see if it bakes properly.
I have so many sensitivities that I technically have to do grain free, but I wanted to try this and see if I could slowly start to modify it to be truly grain free .
teehee, like you, I often wonder, “why the heck does this person think I know this?” Then I step back and try to feel flattered that people think I’m smart ;) Wonderful post, I love that you have taken the time to fully describe every important bit of the ingredients and method. I know many people will appreciate this!
Thanks Cara and yes, I do feel flattered as should you!
Nice job! And now it it our lucky day because we have a new recipe to try this weekend. Thanks!
Ah, thanks Kate!
I’ve given up on gluten-free French bread because there seem to be so many steps to most recipes and I, too, am lazy that way. Guess I’ll have to dig my French bread pan out of the basement and give it another try.
Well, I am the queen of lazy so yep, go down to the basement and dig ’em up! xo, c
This looks sooooo easy!! I want to make bread so bad, but I am kind of lazy and don’t want to do the kneading and waiting and kneading. I do have a mixer. I am definitely going to make this. BTW- does it freeze well? I like to keep bread in my freezer to have with soups.
Thanks Stephanie and YES, it freezes very well. Just wrap tightly and freeze!
Carol those are gorgeous! Congratulations. OCD comes in handy sometimes, doesn’t it :) I think I might be taking french bread to our Christmas dinner this year! Thank you.
Thanks Maggie and yes, fortunately being a little OCd has purposes other than driving those around me crazy :) xo,c
Carol – are there are any modifications for baking at higher altitudes?
Hi Sean,
I live like an inch of two above sea level (ok probably an exaggeration but the Gulf of Mexico is right out my front door and it is almost level with the ground) so I don’t have personal experience with high altitude baking but I did some research for you. It seems that yeast proofs faster at high altitudes so you should most likely cut back on the rising time, do not leave out the salt (that helps slow down the rising time) in fact one article suggested increasing the salt by 25% – just fyi I made 2 batches using more salt and we loved it, I decreased the amount because it seemed to rise better here with less but the taste was the same. One article suggested decreasing the amount of yeast by 25%. Another said to increase the liquid by 1 tablespoon above 3000 ft, 3 tablespoons above 5000 ft and 5 tablespoons above 7000 ft. I got conflicting information about adjusting time and temperature – some said increase the temp and lower the baking time and some said the opposite – oy! Here is a link that should help, I trusted it the most
http://www.livestrong.com/article/495507-gluten-free-baking-at-a-high-altitude/
Good luck and please, if you have a chance – report back here with what you find out.
Hi Carol – I made your French bread tonight and decided to follow the recipe as is. Two small problems; I forgot to get an oven thermometer, and I forgot the brushed on butter until about half way through. All that aside, the bread came out looking and smelling amazing (I took pics and will upload later). However, I find the inside of the sliced French bread to be “tacky” to the touch, if that makes any sense. It almost seems like it wasn’t baked quite enough….maybe another 10 minutes or so? What would happen if I over-baked the bread? Like you, I will try, try again!
BTW, I’ve never ever made bread before. Is proofing yeast supposed to smell that yucky? ;)
Hi Sean – haha proofing yeast has a very “yeasty” smell. My guess is that your oven may run a tad hotter than mine so just turn it down 25 degrees and cook longer – 10 minutes or so. I don’t think you will over bake it. You would have to leave it in a really long time to overbake it. Make sure the bread sounds hollow when you tap it. Also I got a few loves when I was working on the recipe that were a bit wet inside – they were great toasted so don’t toss it out!
Good job an your first loaf of bread :) And make these little adjustments and I think all will be well! :)
After almost a day & half since baking them, the bread was still so moist and delicious, I decided to take it into work and try it on one of my GF co-workers (there are about 7 of us – we call ourselves The Glutineers). She loved it, so I let the rest of the group know that I had “from scratch” French bread with real butter available. Within a couple hours I had one marriage proposal and an offer to buy all future loaves. :D
I am baking two more loaves tonight for that first co-worker; she also has 2 daughters who need to eat GF. I will be trying the reduction in temp and addition of time to see if that makes a difference although with that loaf today, I would not change a thing.
Thank you again, Carol, for this wonderful, incredible, fantastic and EASY recipe, and also for being so generous with your time in answering my questions.
THANK YOU!!!!!!!!
so I just made these- I made the rolls, they are tasty- but mine came out gummy on the inside- a lot like Chebe, if you have had that. It was definitely done on the outside. SO I will try reducing the temp and baking a bit longer next time.
Since oven temps varry a lot, that sounds like a good plan!
This is a great recipe, Thank You
Thanks Brenda
This is a great recipe. I will be trying this very soon, It will be a different variety for a change. Thank You. I am glad I found your site.
Hi Benda, welcome. I am glad you stopped but, enjoy!
These look just so lovely! I’ll certainly be trying them- I miss garlic bread loaves sooo much and these would work beautifully! Yumm…
Me too and I was missing brochette too – now that I have a few extra loaves it’s time for that! :)
Oh my you CLEVER thing!!! This is by far the easiest gf french bread recipe I’ve ever come across. Thank you, thank you, thank you! Xxx
My pleasure Emma and thank YOU!
I’m really looking forward to this recipe and I love, love, love how easy it is! I bought a french bread pan about a year ago but have only made french bread once (it didn’t turn out that special). Thanks for the recipe :)
My pleasure Casidy, Enjoy!
Hi Carol, my daughter-in-law was lamenting the other night about not being able to find GF French bread, she is celiacs & I made her some banana nut bread that she loved. So now I’ve found your site & so happy about that & will definitely try this recipe for her. Thank you so much for your due diligence.
Hi Barbara! I’m so happy you found the site and I hope you and your daughter-in-law love this recipe.
This looks amazing. I can’t wait to try it. I just wanted to verify that if I’m using a flour blend, that I would only use 1 1/2 cups instead of the rice flours and tapioca starch. It looks like in the original recipe that the rice flours and tapioca starch adds up to 3 cups total.
Yilkes! Good catch on my typo Kim – no – it is 3 cups total of flour blend. I corrected the recipe. Thank you so much!
Wow! I’m so excited about this post. The bread looks absolutely wonderful. Thanks for all your efforts in creating the recipe. I have to run out to purchase some french bread pans but like you said this will be a very worthwhile investment. Thank you!
My pleasure, enjoy Nancy!
Thank you for this lovely recipe:) I will try this out:) :) I have not made a lot of bread here lately:)Its time:)
And it is so nice when the house smells of baking bread, don’t you think?
Carol – WOW – Thank you so much!! I have not had bread in a long time and this french bread looks very easy. My hubby just bought me a new Kitchen Aid stand mixer and I’m so excited I can make the bread with it. Thank you for working so hard to make such a wonderful bread. I am running right out to get me the french bread pans so that I can make this. Thank you!!!
I am going to hug you right now (well, virtually, of course). Kurt has been asking for a good french bread recipe. I will be making this for him now for certain. But ONLY ONLY because you said it was easy, easy, easy. ;) This really does look totally awesome. And since my KitchenAid gets used just about every other day in this house, I will be happy to put it to this use for sure! You are awesome, girlie!
xo
k
I love virtual hugs almost as much as I love real ones! Enjoy! xo!!!!!
What happens if you leave out the xantham gum?
I didn’t try so I don’t know. I think it won’t hold up properly and be crumbly but I can’t say for certain. I leave xanthan gum out of lots of things but so far I have not had good results when I left it out of anything that has yeast in it.
Hi there– my fab coworker just brought in this amazing bread for us wheat-freers to try. Thumbs way up! My question to you is, can it be made with brown rice (or similar “more whole” flour) to up the fibre/whole foods nature of the loaf? It’s so hard to find good-sources of low GI & fibre when you don’t do bran/wheat etc…
Although I have not tried it in this particular recipe, I have had great success baking with Superfine brown rice flour from Authentic Foods – you can get it on the internet or in some health food stores. Their brown rice flour is whole grain and milled so finely it doesn’t have that gritty texture associated with gluten free bread. I am certain it would work really well in this recipe. Thanks for stopping by!
Hi, Carol – I really hate to tell you this (since you’re one of my top favorite cookbook authors, and I haven’t had a single failure yet from your wonderful cookbook), but the French phrase is “je ne sais quoi” (thanks to my long ago high school French classes) and it means “something that cannot be adequately described or expressed” – definition from Merriam-Webster. I am looking forward to trying your French bread recipe. Thank you!
Oops! Well the only language I speak other than English is pig latin so I defer to your expertise :) Thanks for clearing this up!
I’ve been baking gluten free for over 20 years and have never had much success with breads . . . Yesterday I bought french bread pans and last night I made your recipe and loved it!!! This morning I made french toast with the left overs – quite possibly the best french toast I’ve ever had!!! I will definitely be making this recipe again and again.
Thank you Valarie and YAY!!!!
This looks great. I’m wondering if you’ve made any vegan breads? I haven’t had much success w/ egg substitutes & since I cannot have gluten & do not eat animal products, I’m missing my breads a lot these days! :) Thanks!
Not traditional breads yet – I will mot likely tackle this in the future. I wil of course let the world know when I figure it out!
We have used 3 Tablespoons to replace each egg with success. We have made them both ways. The egg free version doesn’t fluff up as much as the egg version but they are still delicious and fluffy. This is our go to recipe. My 15 year old makes them often!
Sorry! 3 Tablespoons of garbanzo bean water. Just open a can of garbanzo beans and use the liquid.
Sean I just have to say it was my pleasure! The only thing I want in return is an invite to the wedding! :) Thank you so much for stopping back by with the results.
Thanks Carol! I was wondering, have you ever used egg replacer in this recipe, or heard of anyone using it? I know some folks who can’t have egg and was wondering about the replacer. I might just give it a whirl this weekend as an experiment.
I have not tried egg replacer – my thoughts are it would be ok since there are only 2 eggs in the recipe. It seems like when you go over 2 eggs replaced in a recipe it doesn’t work as well. I guess the thing to find out is if egg replacer has protein in it – that’s what is needed from the eggs.
Pingback: Gluten Free Soft Dinner Rolls Recipe | Gluten Free Recipes | Dairy Free | Blog | Simply Gluten Free
Carol, this is an amazing recipe! I grew up with fresh baked bread, we didn’t purchase the stuff in the store! Since finding out I have celiac I have missed my bread! It was so good I even took a loaf to my mom and she was amazed! She is very critical of bread and even said if I hadn’t told her it was gf she might not have known. My family of 5 ate an entire loaf the night I made it! Thank you so much for your time and energy perfecting this recipe!!
It is my pleasure Emily! Thank you for reporting back!
A friend and I tried this out last night and, despite a goof (for which we had to compensate with more water and sugar) and some salt oversight (at which point were we supposed to add that??), they turned out spectacularly.
Just got your soft bread rolls mail this morning, so will give those a try next. Thanks for all you do!
Have you tried this with just egg whites/ no yolks? I have found bread with whites only has a much better consistency. I’m going to try it on your recipe.
Hi Tricia – yes I did and it was good. I didn’t see a huge difference and when ever possible I try to make my recipes without waste becuase some don’t like to have to toss the yolks but if you just want to use the whites go for it! Thanks for stopping by!
Carol you’ve outdone yourself. These look incredible.
Thank you my friend!
Carol you are amazing! This bread is Wonderful! :)
It’s Grey cup day, thought I’d whip up this bread to go with my famous Chili. You are right is is easy and it’s a hit! Thanks to you! Of course it doesn’t look as good as yours…however I went onsite and ordered the French Bread pan. Can hardly wait until it arrives.
Off the topic abit, I was wondering if you have pasta dough receipes in any of your cook books? I just ordered the Kitchen Aid Pasta Maker set.
Thanks for your expertise and sharing your knowledge with all of us Carol.
Cindy
Ah thanks Cindy! Glad you enjoyed it and the pan will help with the shape for sure! I have a recipe for fresh gluten free pasta on my site – here’s the link http://glutenfreeandmore.com/blog/2011/01/gluten-free-fresh-pasta.html
Thanks for the link Carol. As soon as my Pasta Plus set arrives I’ll be making your recipe!! :)
Great Cindy – I am excited for you!
My, those are some tasty-looking preserves that you are serving with your French bread! Enjoy! I’m going to try this recipe!
Oh very tasty Lorraine! Thank you and enjoy!
After accidentally making without the salt once (oops!) I did try again and found some good uses for this bread. My review: http://sowingtheseedsoffamily.blogspot.com/2011/12/french-bread.html
Great, thanks for reporting back!
Pingback: What Is Gluten | iFriends
Follow up: this recipe is soooooo great for garlic bread and crostini.
This might sound silly but if I don’t have a stand mixer can I use a hand one?
Wow! So I had already checked your cookbook out of the library to give it a “trial run” before deciding to buy (which of course – I immediately put on my amazon list to buy and should have it by Christmas – it is SUCH a good book!). The party cake made for AWESOME vanilla cupcakes (made them before noticing that you actually had a vanilla cupcake recipe in there, lol!) and the No Bake Chocolate Truffle? AMAZING! Oh and do not even get me started on the Snickerdoodles! I use your flour blend in most all of my baking now, SO happy with it! So yesterday, I decided to give this French Bread a go since we were having homemade soup for supper. I’ve tried baguettes before and they never rose quite well enough and got crispy enough. These? These.were.more.than.I.could.have.EVER.asked for! Thanks for the recipe, love the blog and the posts on FB!
THANK YOU Sabrina! Enjoy.
xo,
carol
Pingback: Your Questions About Gluten Free Bread Recipes | Gluten Free Guide
Pingback: Gluten Free French Bread Recipe
This recipe looks great! But I miss the flavor of authentic sourdough bread … Have you come up with a recipe for that yet? Thanks!
No, not yet. I am from the San Francisco area and I miss authentic sour dough too
Can you freeze the dough and bake “small” loafs at a later time?
I did not try to freeze them unbaked but I did bake and freeze then reheat later. It was very good and tasted fresh.
Hi Carol,
This looks wonderful!!!! My daughter is wheat sensitive, but ok with gluten. (I’m still not quite sure I have that straight in my mind :) ) I’m just looking for gluten free bread recipes, because they are easier to find than just ‘wheat-free’ recipes. My question is: Any chance I can put all of the ingredients in my bread machine & still have it turn out all pretty? I know it won’t be long like french bread….but golden & tasty in any shape is good for us :)
Thanks so much!!!!
Hi Suzanne – I don’t understand that either unless she is fine with corn and rice glutens and not wheat gluten. Or does that mean she can not have wheat but is ok with barley and rye? You have me going here. But anyway, I have not tried it. If you can set your machine so it only does 1 rise I think that would be better. I made this bread using milk instead of water and buutter instead of oil and baked it in a loaf pan, it came out wonderful, so I am guessing the bread machine should do fine. Can you check back with me and let me know?
Thank you! Thank you! Thank you! I just made this bread tonight and I am over the moon with the results!! I had given up all hope of ever enjoying a good tasting bread again when I found out I was gluten intolerant but you put a big smile on this bread-lovin’ gal’s face. :) This recipe is simply FABULOUS.
Thank you so much MEl for reporting back! I am glad you enjoyed it!
Pingback: Gluten Free Baked Salt And Vinegar Cod Recipe | Gluten Free Recipes | Simply Gluten Free
Carol, This recipe was fantastic! Thanks for sharing it with us. I am trying to transition my 4-year old to a GF diet, and I need recipes like this to hook him. My 2-year old has been GF for most of her solid food life :) and she really enjoyed eating garlic bread with the rest of her family thanks to your delicious french bread recipe. I am going to tinker with this to see if I can use the breadmaker…I’ll report back if I have any success. Thanks again!
Thank you Amy and yes, please do report back on the bread maker! HAve not had time to play around with that yet so I am dying to know!
AMY, did you ever try and have any luck using the recipe with a bread maker? I just bought one (recently GF), but cannot find any decent French bread recipes to make in my bread maker! Please let me know if you have a good one! Thx!
I want to try this french bread recipe but I cannot find the perforated french bread baking pan. Also, I cannot find any tapioca starch used in some of the recipes. Where might I find these?
Hi Joanne,
I got my bread pan from Bed Bath and Beyond and they also sell them on Amazon. As far as tapioca starch goes, you can google it and find on the internet or try the local health food store or Asian market. It is also sold on Amazon.
Good luck!
Thanks for another great recipe! For those who wondering about egg substitutes, the loaf came out really well. We use Orgran egg replacer, its convienient, cheap and lactose, gluten and egg (obviously =D) free. I would suggest adding an extra 1/4 cup of moisture though, but it might have something more to do with climate (we are in oz). Anyway my kids approve so thanks again!
My pleasure and thanks for the egg sub. Yes, humidity may play a role or the egg replacer may just require a bit more moisture but in any case thanks!!!
Carol, I made this bread today with your flour and it is absolutely wonderful !!!!! Will definitely be ordering more of your flour blend ! I’m also using it to make Amish Friendship Bread and my starter is in progress. I’ve also made a gluten starter to bake bread for our dau. and family and the gluten free starter with your flour blend, is doing just as well as the regular gluten starter. We can have the friendship bread again, thanks to your gluten free all purpose flour blend ! Thank you for all you do.
Oh, thank you so much Maryetta! Would love to know more about your Amish Friendship bread!
Carol, I made 2 loaves of gluten free Amish Friendship Bread for my husband and I and 2 loaves of the reg. (for our kids) and the gluten free ones with your all purpose flour blend, turned out beautifully, just as well as the regular ! We were so pleased ! It froze just as well as the regular, also ! Anyone who loves Amish Friendship Bread (sourdough sweet bread), and is gluten intolerant, should use your all purpose flour blend to make the starter and to make the bread with a starter on baking day. The only thing I changed from the recipe I used before having to go gluten free, was using your flour. It worked like a dream !!!! Thank you so much for your time and patience, in helping us to bake better on gluten free.
Thank you so much Maryetta. I am so happy the flour is working out for you and you are pleased!
Pingback: a gluten-free sandwich bread recipe that worked! | Bocata.com
Just made this bread for the third time. First two times into hotdog buns this time french bread. Family ate it as well today, they were pleasantly surprised and thought it was very good, thought it was softer than it looked on the crust. I really like it. (They are not gf)
Thanks for letting me know, I would never have thought to make these as hot dog buns but what a great idea! How did you form them? Do you have a special pan or did you just shape them onto baking sheets? You have my thoughts racing right now – I could make hoagie buns! DO you know how long its been since I had a really great gluten free submarine sandwich? Glad you family enjoyed them.
Can this be made with something other than rice flours? I am dairy/soy free, and was also told today from my naturopath to start avoiding wheat AND rice because they are affecting my adrenal glands & thyroid. Pretty soon I am going to have to live on air! :-)
Oh dear – I think it would work fine with other flours – can you use sorghum? I would try replacing the rice flour with that. I haven’t tried myself but I see no reason why it would not work. Let me know if you try it and your results!
I tried to make this tonight and the dough was way to liquidy. I don’t have a proper kitchen aid, just beaters–could this make a difference? The consistency was more like pancake batter than a tacky dough that can hold a shape like in the photo.
I think not using a stand mixer may be the difference. Off the top of my head I would say it needs to beat longer with a hand mixer. There is something about the beating that makes it work. I wish I understood the science better. My guess off the top of my head is that with regular beaters you would need to beat for something like 10 minutes – not fun but just think of something pleasant like George Clooney (or who ever you like) while doing it to pass the time.
Pingback: Organic Natural Coupons and Deals 12/30/11
Crusty rolls just came out of the oven. Excellent. Exactly what I needed to complete my GF gumbo tonight. Thanks.
My pleasure David! Thanks for reporting back!
I wanted to let you know I made this for the first time this morning (have to do something when kids get up at 4am!) and it is divine. It is THE BEST gluten free bread I have had – shop bought, scratch or packet made. Thankyou. I’m just about to do my second batch for the day for hamburgers tonight. Its been a year since my 6 year old son has had a hamburger! I now have a fabulous recipe to work with and add my own tweaks to.
So, I bought the pan and tried the bread. Everything looked good until it rose; throught the holes in the pan, over the sides, off the end. Made a giant mess. The only variation on the recipe was using guar gum for the xanthan since I am allergic to corn. Up to the rising stage it all looked like your pictures. I even use a Ktichen Aid stand mixer. What did I do wrong? I have made my own whole wheat bread for over 30 years with no problems. Cooking gluten free seems to be a major flop for me.
Hi Marni – I am wondering how warm your kitchen was – it sounds like it rose too much. I can not imagine that the guar gum would make a difference but I have never tried using it. This has me a little stumped, maybe if you can tell me more about the rising process I can help better.
Has anyone successfully made this bread with brown rice flour? I cannot get it to work. It seems that the brown rice flour soaks up much more liquid so becomes a very stiff dough but if I add more liquid, the baked result is a gummy mess inside a crust.
Hi Heather – I played around fr weeks with this recipe and found that the combination of flours I list in the recipe is what worked. Maybe someone else has had luck with converting the recipe to use brown rice flour.
Delicious!! Made this for lunch, but as free form rolls rather than a French loaf. It was absolutely fabulous. It was declared a success by everyone, with both the wheat and non-wheat eaters commenting that “you’d never know it was gluten free”. I topped a few rolls with garlic/rosemary and others with grated Parmesan and they were honestly to die for. Thanks for the recipe!
p.s I made mine in my Thermomix, am going to link to your site on the Thermomix recipe forum to share my tweaks specifically for that device, but also to spread the good news on such delicious bread.
Great, I will check it out!
hi do you have this recipe on thermomix?
Hi Magdalena,
No, unfortunately we don’t.
Thanks Sereyna – I am so happy you enjoyed the recipe!
Coming from a family of bakers, my mom is well known for her wonderful pies, and my daughter is a pastry chef, and having made a name for myself with my breads I was devistated when I was told that I was highly gluten intolerant. I have always been VERY picky about my bread and so finding your recipe was wonderful! I invested in all the right ingredients and it turned out perfect. The crusty outside comes back with a few minutes in the toaster oven if you store the bread and it makes great rolls. I use my giant muffin pan and I purchased some Anchor Hocking oval glass dishes to make my rolls in. Now I can have hambergers again and crusty rolls for sub sandwitches. Thank you so much!
Thank you linda and I too find that this recipe is easy to modify into other things. I am so happy you are enjoying the recipe!
After reading Marni’s post I would suggest that she make her loaves shinnier and longer and not let them rise as long. My first attempt was in a warm kitchen as it was in the high ninety’s outside and mine rose too much. I corrected the problem suring high heat and humidity by doing the above.
Thanks Linda!
Found this today, giving it a try tonight.
Carol, Can I use a regular loaf pan or shape free hand? I really don’t want to buy another pan. Thanks Joanne
I made it in a loaf pan and it worked great – it takes a little longer to bake, make sure the loaf sounds hollow or it won’t be cooked through. The batter is too soft to hold up to free form shaping.
Pingback: Our Weekly Menu Plan
Pingback: Gluten-Free Panzanella Salad | Queen of Quinoa | Gluten-free + Quinoa Recipes
Fabulous Bread !!! I think that the yeast should be 2 tsp not tablespoons ? It was a little salty for my family, so I cut the salt in half. I was able to make the dough in my bread machine. I just did the prep on the yeast and the olive oil separately, then put it all together in the machine. I cooked it in the oven in a regular bread pan. Great recipe ! Thanks !!! Even my kids who aren’t gluten free LOVED it !
So glad you enjoyed it Emily.
Pingback: Cooking With Kayla: Baked Strawberry French Toast
Made this bread tonight and it is FABULOUS! Texture, perfect. Taste, exquisite. My gluten-eating family could not taste any difference between it and a traditional French loaf. BUT MY BREAD DIDN’T RISE. Twenty minutes in the (unheated) oven to be free from drafts — but no rise to speak of. Yeast was fresh (bought just today from a local health-food store) and at room temperature. Warm water was 100 degrees F by thermometer. My oven baked the bread precisely and evenly, so I doubt it was the oven temp. What could I be doing wrong?!? (Regardless, this bread is DELICIOUS!)
Hmmm. Did the yeast get foamy? That’s the first question. Let me know and we can go from there.
The yeast did foam, a little — not as much as in your photograph. But the yeast should have been fresh, bought from my local health-food store and showing a use-by date of April, 2014! I wonder if adding a little cream of tartar next time would help …?
I have never tried adding cream of tartar but it cold help. I am thinking maybe the water could be a little warmer and you let it stand a bit longer. Also did you add some sugar to the yeast mixture to help it “grow”. I have made this recipe a zillion times and never had any trouble with it rising. Sometimes when the yeast or my kitchen is cooler, I have to let the yeast proof longer first. Also I let the bread rise in a warm place. I put it right by the oven wile it is preheating. The only other time someone had trouble with rising was when their kitchen was cool (they kept their house pretty cool). Ideal it should be warm for bread to rise. Once they got the bread into a warmer place it rose just fine. I hope this helps but if not, let’s work on it some more!
My teenager has recently had to go gf due to a sensitivity. She was missing many staples since she LOVES bread. Just made this to go with our brown rice pasta for dinner and we sampled it…YUM! She approved and I love how simple it was to make. Thank you, thank you, thank you for this recipe!
Oh Jill, so happy you and your daughter enjoyed the recipe! Always thrilled when a recipe is “teenager approved”!
Pingback: Our Weekly Menu Plan
I hope you know that you have found the holy grail of gluten-free :-) This turned out absolutely beautiful. I’m very picky about bread and had all but given it up. I can’t wait to try your cupcake recipe; if that turns out anything as well as the bread I’ll have to get your book :-)
Aww, thanks! I am picky too – I see no reason for us to eat anything that doesn’t taste great. So glad you approve :)
It seems that most GF people are GF & _______. Mine is corn. So I’m wondering if I can just dust the pans with rice flour instead of corn meal? I’m really looking forward to trying this. Thanks!
HI Kim,
I would just leave it out – all the corn meal does is give the bottom crust a little extra something. I am not sure the effect would be the same with rice flour. I have made the bread many times without doing the dusting of cornmeal and it is great! Enojy!
Pingback: Our Weekly Menu Plan
Pingback: Our Weekly Menu Plan
Pingback: Our Weekly Menu Plan
Thank you so very much for making your recipe public! My eldest son was diagnosed last month with celiacs so I’ve been searching for bread recipes so he will be able to eat turkey/dressing this Christmas.
Made this yesterday as he is coming in tonight for the holidays….am currently rising another batch as yesterdays disappeared :) VERY TASTY! NOM NOM :)
It is my pleasure and I am so happy you liked it! Happy Holidays!
Pingback: Our Weekly Menu Plan
I made this recipe for Christmas dinner yesterday. I used my bread maker and the bread came out great! I made a few changes, I used my Go Nuts bread flour and instead of apple cider vinegar(I was out) I used champagne vinegar. This bread came out great, I cut the loaf into cubes so I could make stuffing. It was amazing that my husband who can eat wheat asked me to make another loaf for dinner tonight!!!!!
Hi Alina, glad to hear it worked great in the breadmaker! People often ask me and I didn’t know the answer. The champagne vinegar sounds like a lovely addition!
I just followed my bread machines directions and then baked it on the gluten free setting. It took 3 hours to bake but it was worth the three hours.
That’s great to know! Thank you.
I tried your recipe yesterday and it is delicious. However, the bread did not fully cook on the inside. I have checked the temp in my oven and it is correct. I did forget to put the water in the oven, could that have made so much difference? I am going to try the recipe again but make rolls and see if they bake through better. If you have any tips for me to try I would appreciate hearing from you.
Thank you for making gluten free enjoyable.
The water really does make a difference, I tried baking the bread with and without the water and it always comes out better with the water. One thing is that you have to make deep slashes in the bread so the internal steam escapes. Make them like an inch deep. Thats the first thing I can think. Humidity can effect baking as well but I live in a very humid place. Sometimes I just have to bake the bread a little longer though because it is extra humid. The trick is to tap it and keep baking until the bread sounds hollow. I hope this helps!
This is by far my favorite bread recipe on this website, but Carol, please give us a sandwich bread recipe! Your blog is the best source of recipes I’ve found on the internet thus far. I’ve been a diagnosed Celiac for almost four years now, and I really enjoy experimenting with baking. As I continue my perilous search for a quality sandwich bread recipe, I continue to sigh at loaves of sub-par bread. I know that if you blessed us with a simple sandwich bread recipe, it would be a touchdown. Please, please, please! I miss sandwiches…
Hi Pauli – ok! I am going to get to work on it. But just as a note, I have made this bread, baked it in a loaf pan and it works great sliced for sandwiches. I am a Californian though so was very used to using sourdough as sandwich bread. This isn’t saou dough but it has a similar consistancy. You just need to bake a little longer. But I will get on the sandwich bread recipe soon!
Thank you so much for your great detailed explanation of the process. Just starting out in the gluten free world and am making or should I say trying to make seed rolls..I had the read the recipe numerous times thinking I had misread it because the dough looked so gooey.
Hi Ani – yes gluten free baking is different and people who are used to baking non-gluten-free often think they are doing something wrong when the dough looks more like batter. It is my pleasure, enjoy!
I don’t have that french bread pan……………any suggestions on how I can bake mine??
You can bake it in a loaf pan – it will just take a bit longer to bake, start with 10 minutes more and check it, you need that inside really baked through so make sure it sounds hollow when tapped and make deep slits in the top to release the steam. Enjoy!
I have been making gf breads homemade for quite a while now, and i find the paddle attachment works better than the wisk, so just a thought and worth a try….and this is by far one of THE BEST recipes we have had the privilege of making and EATING!!
Thank you. I did try this with the paddle attachment and personally preferred the whisk in this particular recipe but unless you are comparring side by side as I was, probably there is no difference. But if the paddle works better for you, then use that! Thanks so much for your very kind words!!!
I’ve been searching for a crusty bread I can use for bruchetta or meatball subs! I’m wondering what you’d recommend for someone who doesn’t use rice flour at home? I’m pregnant and trying to cut exposure wherever I can. I make a pizza dough with sorghum and millet flours and a bit of tapioca and/or potato starch, I also have buckwheat flour handy. Any ratio recommendations? I’d realllllly appreciate it! (Ordering the pan right now)
Hi Lauren. I am hesitant to say anything regarding a recipe I have not personally tried but if I had to take a guess as to how to adapt to rice free here is what I would do – I would substitute the white rice flour with sorghum for a total of 1 1/2 cups and the sweet rice flour with more tapioca starch for a total of 1 1/2 cups. Sorghum is denser than rice so it may be weter inside, make really deep cuts and check, you may have to bake longer.
I am really curious to know how this turns out, check back and let me know, will you? Good luck and I hope this works!
And congrats on the baby on the way! What a blessing and how good of you to be such a great mom right from the start!
Pingback: Our Weekly Menu Plan
Pingback: Our Weekly Menu Plan
Hi, I was wondering if you still need to use zanthum gum if the gluten free flour blend already has it in it.
Yes Pat you do. Because the yeast adds rise you need the extra support that the xanthan gum provides.
Carol, This bread just did not rise. How did you get yours to rise in 30 minutes? Katie
Make sure the yeast is good and you place in a draft free spot in the kitchen.
Just wanted to add that I had this in a warm oven while rising. it did not rise at all. My yeast is good . I mixed the yeast with the sugar and water and it bubbled really high. I let it rise for 35 minutes and baked it. It has cooled and it is solid goo on the inside. The flavor is good so I am trying to toast it. Very discouraged. Once again trying to “save” gf bread with the toaster.
Mine just rises. I make this recipe almost weekkly. I have never put it in the oven to rise, maybe it was too hot and killed the yeast. Just sit it in a warm spot in your kitchen and let rise there. If you are sure your yeast is good then that is the only thing I can think that could be wrong.
Carol, I didn’t add that I replaced the eggs with egg replacer. Is this what caused the doughy wet middle? Do you think a flax or chia “egg” would work better? I really would like to try it again. Thank you so much.
Carol, I just tried this recipe, and I love the taste and “solidity” of the bread, but I had two issues on my maiden run:
1. The bread rose, but the expansion was more “out” than “up”.
2. The crust was well into the “brown” range after 40 minutes at 400 degrees. I use an oven thermometer, because I don’t trust my oven, so I’m sure about the temperature.
I’m thinking about adding a touch more xanthan gum and flower to address the first issue, and baking at 375 and checking at 30 minutes to address the second, but I would love your (or anyone’s) input.
Hi Brian,
So many things affect baking. I would try your suggestion of a lower temp and to check it starting at 30 minutes. You want to make sure the bread is hollow sounding when tapped. Regarding your first issue I am wondering if the place you let it rise was too warm? I find that when my kitchen is hot it rises a bit fast and then it goes more out than up. If this isn’t the case then by all means add another 1/2 teaspoon of xanthan gum for extra structiure. Cafefull about adding too much, you don’t want it “gummy”. Good luck!
I usually proof my gluten-based bread in the top oven, which I warm to about 140 degrees and then leave the door cracked. I’ll try the “pan of hot water in a cold oven” approach next time, and hold “mess with the ingredient list” as a last resort. Thanks!
My pleasure, good luck!
Carol, I have a double baguette loaf pan that is 2 1/2 ” wide by 17 1/2 ” long. Your loaf pan looks narrower and shorter than mine. Would mine work and if so how would I adjust the baking time?
It will work just start checking it about 10 minutes sooner on baking time. Make sure they sound hollow, thats the thing otherwise they may be too mosit inside.
Pingback: Our Weekly Menu Plan
Pingback: | our weekend | | JessicaLynette.comJessicaLynette.com
At last a recipe that looks like proper bread, tastes like proper bread but is GF. Bread was the one real thing I really missed and this recipe is great! Thanks! Can you make puff pastry? Recipe would be well received
Hi Rachel. Thank you! Puff pastry is not something I have master yet. One day…
I just made your french bread recipe, it’s great .I just started baking gluten free and i could not find a bread recipe that was edible thank you
My pleasure Paulette, happy you enjoyed it!
Second time through went _much_ better – the Worship Council at my church all approved it for our communion services, and one of them told me “If I didn’t know it’s gluten-free, I wouldn’t have known it’s gluten-free.” I took that as high praise.
I have one question about the xantham gum – does it actually _dissolve_ in the oil, or am I just looking to get a good colloidal suspension so that it distributes better in the dough?
Hi Brian. I find that it just kind of makes a thick looking liquid (almost gel-like) but doesn’t fully dissolve. I tried this recipe many ways and found that stirring the xanthan gum into the oil just made it work better. After a little research I discovered that oil makes xantham gum “work” better, so I do it!
Also, do you have any suggestions for how I should change the baking protocol if I want to bake the recipe as a single loaf rather than two loaves?
I have made this as a loaf in a 9 by 5 inch loaf pan, you just may need to bake it longer – the thing you are looking for is that hollow sound. If the top is getting too brown just cover with a pice of foil for the last 10 minutes or so of baking. I would try increasing the time by about 10 minutes or so, but check it. Good luck!
A couple of suggestions based on the batch I baked last night.
1. Substitute 1/3 cup of the flour mix with teff flour. It gives a nice “whole grain” texture to the loaf.
2. Use honey instead of sugar.
3. Add the vinegar to the water and sugar/honey mix for yeast blooming. Yeast like the vitamin C in the vinegar.
I’m going to find a good vegan egg substitute for this recipe, in order to accommodate the vegans in my congregation. Once I find one that works well, I’ll let y’all know.
Thanks Brian!
I’ve made this twice and the second time it worked great! The first time, my loaves were very dense and “yeasty” tasting. The second time, I cut the yeast down to one package of dry active yeast…it bubbled and rose far better than my first attempt. When I left the loaves to rise, they doubled as they should. I think that the first time, I not only used too much yeast, but it may have been old as it took forever to activate and the loaves never doubled in size. I’m just so happy it worked…and was so easy!!!
Hi Lynne yes fresh yeast makes a difference. I am glad to know the recipe works with less yeast too
Pingback: Gluten Free French Bread | Going Cavewoman
I had to make this bread twice to figure out what was going on.
I have been making Julia Child’s French bread for many years. I have added her baking technique to this recipe.
With her technique you only need 1 tbs yeast (Maybe a single packet [2 1/4 tsp] would be enough).You can also taste the salt, so I reduced it from 1 1/2 tsp of sea salt to 1 1/4tsp. That would be a scant tsp of regular salt. You want to taste the bread, not salt.
The Julia Child technique is to supply a burst of steam and then after a few minutes get the water out of the oven. She adds boiling water to the pan in the oven. The oven is preheated to 450°F. After she puts in the bread, she puts a hot brick or equivalent in the pan of boiling water, which produces violent steam. After about eight minutes the water is removed entirely, the oven temperature is reduced to 350° or 400° F, whichever you prefer, and the bread then bakes normally.
I use a 5 lb weight-lifter’s plate instead of a brick. I heat it on a burner until it is really hot, and at the right time, insert it in the oven with tongs, protecting my hands and arms from possible splashing water. You remove the water when the bread shows the slightest coloration. It will NOT have fully risen at this point.
You do not need to butter the crust. It serves no purpose. the Julia Child method gives you a dark crust that is crisp and a beautifully expanded crumb (interior).
La coupe (the slashes) should be done just before putting in the oven, not before rising. It may make only a small difference with this cake-batter like mixture, but it is noticeable.
When you have a perfectly looking, perfectly chewing baguette, it nevertheless tastes of rice. At least the excess yeast concealed the rice taste. I use this rice mix because my system cannot deal with soy, sorghum, millet, or teff. It reminds me of that championship golf course in Hell. They have no golf balls available. : )
PS
Don’t burn youself when fooling with the hot brick/metal/ whatever. I wear a leather gardener’s glove.
PPS
I am going to try it without the eggs, which I presume are there for their protein, not their flavor. French bread consists of flour, yeast, water, and salt.
Attached is my wife’s photo of the second loaf, which I am going to cut into for dinner tonight.
And here is a picture my wife took during dinner this evening showing a slice of the bread and the beautiful crumb.
Just got done making my first batch from this recipe. VERY GOOD ! Next I’m gonna try to make a sandwich bread loaf using this same recipe. Thank You :)
Thank YOU Carol, so happy you enjoyed it!
no matter how many times i tried, my dough came out like crumble. i have no idea where you get a scoopable dough from. Is it because i used the robin hood gluten free flour blend?
Hi Mel,
First of all you can get the dough forms at kitchen shops or on Amazon. Secondly I am not familiar with that flour. I have made this recipe hundreds of times and it always comes out perfect so I am guessing the flour may be the reason.
I had the exact same problem as Mel. I followed the recipe but it was crumbly and not anywhere near batter consistency. The Robin Hood Gluten free flour is made of Rice Flour, Sugar Beet Fibre, Potato Starch and Tapioca Starch. Any suggestions?
Anne,
I’m not familiar with that flour but I’m guessing the sugar beet flour dries it out. I would suggest using a good quality cup-for-cup replacement flour and follow the recipe as directed.
xo,
Carol
Pingback: The most delicious bread recipes | For Women
I just found your recipe and was going to try it in the morning, but don’t have “French bread pans” do you have any suggestions to try without??
Hi Lisa,
You can use a 9×5 loaf pan, just cook it a little longer. I don’t remember how much longer though, I think about 10 or so minutes just check it. If you do, make the slits a little deeper so its not gummy on the inside.
xo,
Carol
I used Pamela’s Artisanal blend, and added maybe 1/4 tsp xanthan (the blend already contains guar). Let them rise in the oven, covered loosely, then baked at 400 for 40 mins. I also didn’t have the dough forms, so I put them in regular loaf pans, on parchment paper. They came out beautifully, and they are delicious. I forgot to butter them before baking so I did it after they came out of the oven, and they lost their crustiness–fine by me. A crusty loaf would be nice, but soft is great too! They’ll crisp up in the toaster, I’m sure. I’m so happy with how they turned out. This is a fantastic recipe! Thanks!!
Amy,
You are a crafty one! I’m so happy you enjoyed them!
xo,
Carol
I tried this bread, and what can I say?
It is the only ever gluten-free bread I made that was not just edible, but absolutely great.
None of the people eating it realized it was gluten-free until I mentioned it.
I used the ATK gluten-free flour blend, however.
Carol, thank you for this lovely recipe. I’m still tweaking it, but I’ve made it three times so far, and it’s been so helpful for the kids lunches. This last time, I swapped out 1/2 cup brown rice flour instead of all white rice flour and used gelatin instead of xanthan gum (twice as much gelatin as xanthan). It changed the mixer from doughy, to more pancakey batter, but the taste and consistency was better. Any tips for swapping out the xanthan gum?
Hi Julie,
Love that you’re making this your own. Well a few good subs are sweet rice flour, arrowroot and cornstarch, you can find others online.
Pick what suits you best and I’d say try it out!
xo,
Carol
I was about to give up on making my own gluten/grain free bread, but I saw your receipe and decided to give it another shot. I am so glad I did. Not only was the receipe easy as stated, however this bread is so delicicious, I would put it up against any gluten or grain laden product out there. Since we are also grain free I substituted 1 cup of moong bean flour and 2 cups of tapioca flour for my flour mixture and it was incredible! Thank you for giving me my bread back!
You’re welcome Amber! I’m so happy to hear how well this worked for you! :)
xo,
Carol
Tried your recipe. Turned out beautiful however only realized after eating it & reviewing the recipe that I actually only put in 2tsp of yeast instead of 2TBS. So I tried it again the next day & it flopped. Is 2TBS too much yeast?
Hmm, I don’t know what to say to that Lea. I always use 2 tbs of yeast if you can get away with tsp, great!
xo,
Carol
Carol,
I love this recipe! I’ve made it sever times for me and other GF friends. My gluten loving husband even says it’s good! My question is this…I’m getting away from gums. (Less tummy trouble) I’ve been subbing flax seed for xanthan, equal amounts. Have you done this and how does it turn out?
Amber, Yes I’ve tried it. Here’s a good recipe for a gum free flour, it’s called pixie dust – 20 grams golden flaxseeds, 10 grams chia seeds (white or black), 5 grams psyllium seed husks. Grind all ingredients in a coffee grinder until floury. Store in the freezer until needed. (Note: 10 grams of this powder stands in well for 1/2 teaspoon of xanthan gum in other recipes. Just remove the same weight of flour form the recipe) Hope this works for you! xo, Carol
I’ve made this recipe several times using tin foil as forms. No problem just a little inconvenient and sometimes misshaped. So I decided to purchase a French bread pan. It is perforated. What a disaster! It seeped through the bottom requiring that I bake the bread on my baking sheet. How do I fix this? Please give me some pointers!
Amber, hmm mine is perforated as well, I don’t understand why its seaping through … sounds like maybe your dough is too thin, it should be a thick sticky dough not a batter. You could also line your forms with tin foil. If it is too thin you could be over beating it or not beating it enough, its hard to say. Look and see what it looks like in the pictures from the blog post. :) xo, Carol
Pingback: Amazing Gluten-free French Bread | Recipe Idea Shop
Pingback: Gluten Free Breakfast Crostini | Recipe | Simply Gluten Free
Would this recipe work for making rolls? Do you know if it would require a special pan or would making them round help hold their shape as they bake?
Jenny,
Yes, you can put it in a muffin pan, they would be muffin shaped … but they do need the support of the pan. Cook them for less time though, not sure exactly how long. I would start checking it at about half way through. xo, Carol
How would this work in a bread maker?
I don’t know Meg, I haven’t ever tried it … Sorry!
xo,
Carol
Pingback: Gluten Free Baked Salt and Vinegar Cod Recipe | Simply Gluten Free
Carol,
I made these today and have run into 2 problems. Girst, my batter was super runny… I’ve been baking GF for years now so I realize it isn’t supposed to be like a regular dough. But this was soupy. I had to add mor flour or it would ha en run everywhere. Second, they rose beautifully but then completely fell and sunk in when I baked. I’m so disappointed. I really did follow your recipe and instructions to a “t”. I hope it tastes alright because I’m going to be cutting them up for stuffing… This is a fail no one has to know about! But I wondering what I’ve done wrong. Was I supposed to add baking soda or powder? I have reread this recipe and don’t see it in there.
Maggie,
Without knowing what brand of flours you use, it’s hard for me to know exactly how to advise you. Can you give me more specifics?
xo, Carol
(French Bread Recipe) I can not eat egg and butter.How can I replacer it? egg free and to use oil . Thank you
Hi May,
Use an egg replacement for the eggs and vegan butter.
xo,Carol
Pingback: Gluten Free Dairy Free Soft Dinner Rolls Recipe | Simply Gluten Free
Pingback: Ham and Cheese Sandwich Balls | Recipes | Simply Gluten Free
Pingback: Eggs Baked in Tomato Sauce | Gluten Free Recipes | Simply Gluten Free
Pingback: Perfect Bready Pan Pizza – jovsgluten
Pingback: Banh Mi – jovsgluten
Pingback: Gluten Free Italian Baked Eggs | Recipe | Simply Gluten Free
Pingback: Homemade Ricotta Cheese | Recipe | Simply Gluten Free
Carol, can I make the gluten free flour at home , buying my own individual flours since the premixed one is rather expensive. Thank you .
Hi Ivanka,
Yes, here is the link to how I make mine. https://glutenfreeandmore.com/blog/2008/01/carols-all-purpose-gluten-free-flour-blend.html
xo,
Carol
The recipe is perfect.
My new favorite GF bread.
No tricks and very easy to bake!
Thanks you,
Cheers from Brazil
Pingback: Gluten Free Italian Meatball Sliders Recipe | Gluten Free Recipes
Pingback: Gluten Free Split Pea Soup | Gluten Free Recipes | Gluten Free Diet
Pingback: Gluten Free Baked Cherry and Brie Appetizer Recipe
Pingback: Gluten-free London Broil with Balsamic Onion Marmalade | Gluten Free
This recipe is fantastic! So good, in fact, that I went out and bought a perforated french bread pan to use for this recipe. I first made it and just made an artisan type loaf on a stone baking sheet. Excellent! Even my husband, who’s not gluten free, thought this bread was wonderful. It’s especially good dipped in the oil/balsamic vinegars that are so popular right now. This will be my new go-to recipe! We are having dear friends over Saturday night for supper and this bread is on the menu. Thank you!
Can you tell me if the recipe will work with egg replacer?
Hi Jessica,
I haven’t tried it. Ive made it with just egg whites though, and it came out great!
xo,
Carol
Pingback: Gluten Free Creamy Asparagus and Pea Soup Recipe
Received the french bread pans today in the mail and can’t wait to bake this bread tomorrow! I do better with weighing my flours, just seems like I can make recipes more consistently time after time this way. Do you happen to have specific weights for the flours in the recipe? Thanks!
Hi Christine,
I did a little calculation and here’s what I came up with. I didn’t convert every ingredient, just the flours, starch, and the xanthan gum in case you wanted that too. For the 3 teaspoons xanthan gum, 22 grams. For the 1 1/2 cups white rice flour, 240 grams. For the 1/2 cup sweet rice flour, 80 grams. For the 1 cup tapioca starch, 113 grams. Let me know how this works out for you.
xo,
Carol
Carol, this bread is fantastic! Best success I’ve had with French bread since going gluten free! I made two changes: didn’t have all the individual flours, so I substituted with Bette’s Feather light blend and added a massive tablespoon of chopped garlic. Garlic bread without the added butter. Husband gave two thumbs up! Thank you for you great recipes.
Pingback: Gluten-Free Panzanella Salad - Simply Quinoa
Question for those who understand the chemistry of this recipe: What is the purpose of the apple cider vinegar? Is it something required in a converted recipe (from gluten to gluten-free)?
Thanks for your help.
The vinegar helps the bread rise and give it strength. Yes, the vinegar is helpful for gluten-free baking. Hope this helps!
xo,
Carol
Please explain the purpose of the apple cider vinegar. I would like to use my favorite “leaded’ bread recipe to make it gluten-free. Not sure what the vinegar does to the chemistry of the bread…. Thanks!
The vinegar helps the bread rise and give it strength.
IF using a flour blend that has xanthin gum in it, do I added the 3 teaspoons of xanthin gum the recipe calls for?
Yes, you still add the xanthan gum. In other baked goods that call for it you may be able to leave it out if your flour contains it, but for bread and pizza crusts you’ll need to keep it.
Wow my mom will love this Gluten free bread! Thanks for sharing this.
I cross react to corn ingredients. I have the perforated pans. What would I use instead or will nothing work? TYIA!
Hi Sue,
The cornmeal is optional. Hope you enjoy this!
My friend brought this to a dinner last night. WOW!!! IS ALL I CAN SAY!!! I am not gluten free but do it occasionally. She sent me here and I am buying the flours this weekend at the asian store. Thank you!!!!!
Thank you, Cherylee! Glad you like it!
I was able to successfully bake this recipe with aquafaba today. I used a little more than 1/4 a cup in place of the eggs. The aquafaba was super heavily reduced (think – nearly at the jelly state when refrigerated Lol).
As a breast cancer survivor, eating gluten free has really helped with my lymphedema. Thank you so much for this wonderful recipe. It will be a staple around here from here on out.
Thank you Evelyn! I appreciate the note – it will be helpful to anyone who wants to replace eggs. And that’s wonderful news that you are a survivor. Cancer sucks and I’m happy to see people defeat it.
Can I just use regular gf flour instead of the flour mix?
Hi Erica,
Yes, it says in the recipe notes that in place of the flours and starch you can use 3 cups of a good, pastry-quality gluten-free flour blend.
Hope you enjoy it!
This is a great recipe. I used 2 teaspoons of xanthan gum because I used a one to one flour mix. Mine were done in 30 min. I recommend cooking them to an internal temp. of 210. Best recipe out there for a gluten free french bread. Thank you!
I’m a gluten-eater, but my wife has celiac and so I’ve been intimately familiar with gluten-free cuisine (the good, the bad, and the gritty) for nearly 20 years. In all that time, I’ve tried all manner of gluten-free bread — all the while, gleefully indulging in the real deal whenever I’m away from home or otherwise able to do so.
And it is my informed, objective opinion that THIS BREAD IS AMAZING. It is easily THE BEST GF BREAD I’ve ever encountered — at home, in the store, or at any restaurant. But it holds its own against the real deal, too.
And that’s even after I goofed up the recipe quite a bit. I didn’t have Xanthum Gum on hand, and I used just King Arthur all-purpose flour instead of the recommended blend. Didn’t matter. The bread I made was crisp on the outside and fluffy, bubbly, chewy, and bouncy on the inside.
I made the bread in muffin tins (my french bread pan is now ordered and in the mail, thanks to this recipe) and experimented with different amounts of flour in every cup. The results were STUNNING.
The cup with the least flour was as runny as pancake batter, and the cup with the most was as dense and cracked as plaster — and I thought both of those, at least, were going to be epic failures. But the runny-batter yielded the fluffiest, lightest, and runaway favorite of my gluten-eating mother. And the dense-as-plaster cup (about double the amount of flour called for) resulted in, no joke, the BEST GF BISCUIT I’ve ever had. (And I don’t say that lightly. I’m a Southerner, and I was taught to bake biscuits by the best of the best of local, down-country talent — fluffy, light, divine things full of fat and gluten. This happy little accident wasn’t a perfect replacement for “the real deal” but it was darn close and downright tasty.) And everything in between was delicious, well-textured, chewy, bouncy, bread. BREAD PEOPLE. They all looked, smelled, felt, and chewed like real bread. The only proof these were gluten-free were the subtle taste differences between wheat and the other grains used in the flour blend, but even those differences were hard to discern over the perfect texture and delicious, buttery, yeasty overall flavor.
The fact that this recipe can modified with extremely different amounts of flour left me floored. First, it means that the recipe is really idiot-proof for those (like me) who are not the best at baking. But it also got me excited about all the other variants I can now try to make on purpose. Cakes, sandwich bread, biscuits, even pan-breads like naan — I’m excited to experiment some more.
HANDS DOWN THE BEST GLUTEN-FREE BAKING EXPERIENCE I’VE HAD IN TWO DECADES OF DISMAL DESPERATION.
Props to the chef.
WOW! Thank you so much, Robert. What a fantastic compliment! And I love that you were able to adapt the recipe into so many other things – how cool is that?! I’m very happy to hear that you had such a good experience with this recipe, as it’s one of my favorites, too. Keep me posted on what else you do with this recipe – I’d love to get some specifics from you so that other readers can try what you did.
With social distancing I’ve been experimenting with GF recipes as I am GF, DF & SF (last one is soy). My first try with this recipe was delicious but with a little “gummy” texture on the inside. Next time I’ll try your recommended lower temp and a longer bake time. Question…you say to use the whisk attachment on the mixer and most of my batter was stuck inside it after the three minutes of mixing. Should this have happened?
I tried this recipe yesterday. I was surprised to see it calls for 2 tablespoons of Dry Active Yeast. Most recipes I researched state 2 1/4 teaspoon, and I thought it was a typographical error. However, I followed the recipe, let it rise for 45 minutes (not the 30 as stated), and it did turn out a lovely golden brown colour, staying the size it had risen to before I put them in the oven. Unfortunately, I find it incredibly dense and heavy with very little elasticity and bounce, with hardly no air bubbles inside. I think I will try recipes with less yeast next time.
Pingback: 20 Best Ideas Gluten Free French Bread Recipe - Best Recipes Ideas and Collections
Just made this tonight and it was the bomb. I live at 6000 ft. altitude, so I upped the temp to 410… I also used a thermometer to check internal temp of bread…. I ended up having to bake it quite a bit longer to get it over 200 degrees, but it was worth it. The internal texture was amazing. I also used a flour that had xanthan gum in it already, so I only used 1/2 teaspoon of xanthan gum. The crust was thick and crunchy… I will probably try a lower temp next time to get a softer, less browned crust.
Thanks Lizze! Glad you like it. Appreciate the info about your tweaks for higher altitude.
I’m having such a hard time with this recipe and cannot figure out what I’m doing wrong :( I live at 1300ft above sea level so I don’t think altitude is an issue…. but I’ve tried this twice now and both times the batter is extremely runny… do you have any tips for this? I’m not sure where I’m messing up – it doesn’t look anything like what your batter does and literally won’t shape in the bread form its so runny. I’ve used all the same ingredients- I mixed for 3 minutes on high, maybe its too mixed? I know this will be difficult for you to trouble shoot I’m just baffled that I can’t get this right :'( Thank you so much for the recipe and I hope I can figure it out!
Hmmm… let’ see if we can figure this out. Did you make ANY ingredient swaps? Did you use the specified flours or one flour blend? If a flour blend, what brand or what ingredients are in it? Is your yeast fresh and not expired by chance?
I figured it out finally! My xanthan gum was outdated and once I got a new bottle the recipe worked perfectly- SO glad, it is delicious! Thank you so much for a wonderful recipe!
Great! I’m so glad you figured it out and that it turned out good!