
Classic Gluten-Free Pie Crust Recipes
Created by Jules Shepard, this pie crust calls for eggs and dairy. If dairy and eggs aren’t for you, scroll down to the bottom of this page for an amazing recipe for a flaky dairy-free, egg-free, gluten-free pie crust.
Classic Gluten-Free Pie Crust Recipe
Here is a simple gluten-free pie crust recipe with spectacular results. The vodka helps tenderize the dough; the alcohol bakes off, leaving no flavor.
This gluten-free pie crust recipe holds up to summer fruits like gluten-free peach pie, gluten-free blueberry pie, and gluten-free strawberry rhubarb pie. It’s also a delicious gluten-free pie crust recipe for the fall and winter holidays, pairing wonderfully with gluten-free apple pie, gluten-free pumpkin pie, or gluten-free pecan pie.
Classic Gluten-Free Pie Crust
Ingredients
- 1 cup Jules’ Homemade All-Purpose Flour Blend , more for dusting
- ½ teaspoon sea salt
- 3 tablespoons butter or dairy-free alternative
- 2 tablespoons vegetable shortening or palm shortening (not coconut oil)
- 1-2 tablespoons cold water
- 2 tablespoons vodka (or more cold water)
- Egg wash (1 egg + 1 tablespoon water) or milk of choice
Instructions
- In a large bowl, whisk together flour blend and salt.
- Cut in butter and shortening.
- Gradually add vodka and enough water so that dough forms a ball. Err on the side of dough being wetter rather than crumbly. Don’t over-work the dough or it may become tough when baked.
- Form dough into a disk. Wrap it in plastic wrap and set it aside to rest 30 minutes while you make your filling.
- Dust your work surface with gluten-free flour and roll dough out evenly into a circle at least 1 inch larger than your pie pan. Gently transfer dough to pan and pat it into the pan. Trim the edges of the crust to an even length of approximately 1 inch larger than the diameter of your pie plate. Gently fold the edges under and press with a fork or pinch into a fluted design with your fingers. Cover with plastic wrap and freeze 30 minutes to chill.
- Brush edges of crust with egg wash or milk of choice before baking.
Notes
Nutrition

Jules' All-Purpose Flour Blend
Ingredients
- 1 cup cornstarch, tapioca starch or arrowroot powder
- 1 cup potato starch, tapioca starch or arrowroot powder
- 1 cup very fine white rice flour, sorghum flour or buckwheat flour
- ½ cup corn flour, millet flour, sorghum flour or brown rice flour
- ½ cup tapioca starch, cornstarch or arrowroot powder
- 4 teaspoons xanthan gum or guar gum
Instructions
- Whisk ingredients together in a large bowl until well combined.
- Refrigerate in a large zip-top bag or a sealed container until used.
Tips for a Successful Gluten-Free Pie Crust
Does the thought of creating a gluten-free pie crust from scratch intimidate you? It shouldn’t. Making an allergy-friendly pie crust isn’t difficult. Yes, you use a different set of ingredients but the methodology is pretty much the same and the results are just as tasty and well worth the effort. Here are some gluten-free pie crust recipe tips appropriate for any food allergy, preference, or intolerance.
Because gluten-free dough can dry out, making it more difficult to work with, we’ve included some steps to ensure your gluten-free crust is as flaky and delicious as possible. Be sure to read these first!
A delicious gluten-free pie starts with a delicious gluten-free crust. Follow these tips for a tender, tasty pie crust.
Mixing the Dough
Don’t over-mix ingredients. The less the gluten-free dough is worked, the more tender the crust.
Rolling the Dough
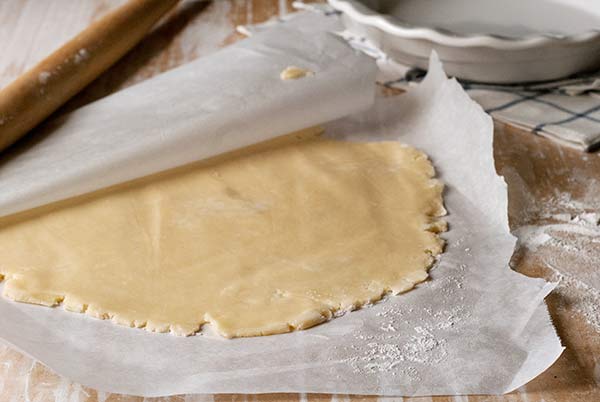
To roll out the gluten-free dough, dust your work surface thoroughly with gluten-free flour and use a well-floured rolling pin to prevent the dough from sticking. Another option: Roll the dough between two generous pieces of wax paper. This simplifies clean up.
Plating the Dough
If you roll the gluten-free dough out on a floured surface, transfer the dough onto the pie pan by rolling it onto the rolling pin first. Then place the rolling pin on the edge of your pie pan and unravel the dough. Press the dough gently into place and trim the edges to fit.
If you roll the dough between wax paper, remove one piece of wax paper and carefully place that side of the dough into the pie pan. Press the dough gently into place. Remove the top piece of wax paper and trim dough edges to fit.
Work Fast – Gluten-Free Dough Dries Out!
This is important. This dough recipe will dry out if you let it sit too long—so work quickly. Roll the dough out immediately after you make it. No need to chill gluten-free dough before rolling.
Glossing the Dough
Brush the top of your pie with maple syrup. This adds a touch of sweetness and gives the pie a beautiful shine.
Chilling the Dough
Refrigerate the gluten-free pie crust for about 30 minutes before you bake it. This helps the dough keep its shape and prevents the crust from shrinking in the oven.
Cover It Up
If the crust browns too quickly while the pie bakes, tent it loosely with a piece of aluminum foil.
Making a Gluten-Free Pie Crust that’s Egg-Free (and Dairy-Free, Too!)
If you are gluten-free, dairy-free, AND egg-free, then this is the pie crust recipe you’ve been waiting for. If you are gluten-free but dairy and eggs are OK for you, feel free to try this simple gluten-free crust recipe instead! But trust us, you’ll miss neither the eggs nor milk in the recipe below.
This gluten-free dough is easier to work when it’s rolled out immediately so if you’re making a double-crust pie, prepare the filling first before making the gluten-free pie crust. For a one-crust pie, halve the recipe.
Egg-Free, Dairy-Free Pie Crust
Ingredients
- 2 cups gluten-free High-Protein Flour Blend or gluten-free flour blend of choice
- 2 teaspoons xanthan gum
- Pinch salt
- 2 tablespoons maple crystals, date sugar or granulated sugar
- 8 tablespoons coconut oil
- ½ cup cold water
- 4 teaspoons cider vinegar
Instructions
- Pre-heat oven to 350 degrees. Lightly oil a 10-inch pie pan.
- In a medium bowl, combine gluten-free flour, xanthan gum, salt and maple crystals. Set aside.
- Melt coconut oil until liquid but not hot. Add liquid coconut oil to water and cider vinegar, stirring to combine.
- Pour oil mixture into dry ingredients and mix with your hands until just combined. Do not over-mix or the gluten-free dough will become tough. Dough will be a little wet.
- Divide dough in half, keeping half covered. Turn the uncovered half of dough onto a work surface dusted with gluten-free flour and form it into a flat disk. Roll out dough with a floured rolling pin to ¼-inch thickness. Work fast as dough dries out rather quickly.
- Carefully place dough in prepared pie pan. Crimp edges and add pie filling. If desired, top pie with second crust and crimp edges together. Slit top crust in several places for steam to vent. Chill pie for 30 minutes in the freezer before baking.
- To precook the gluten-free pie crust without filling, chill crust in the freezer for about 30 minutes. Preheat oven to 350 degrees. Remove the gluten-free crust from freezer and prick bottom a few times with a fork. Line the crust with parchment paper and fill it with pie weights or dried beans. Bake in preheated oven for 20 minutes or until parchment paper pulls away from crust without sticking. Remove paper, along with weights or beans, and bake an additional 15 to 20 minutes or until bottom is golden.
Nutrition
Originally published in October 2016 by Gluten Free & More.
Have you tried this recipe? Give it a star rating and let us know your thoughts in the Ratings & Reviews section below.

How long do you bake the crust for? I assume you bake it before you put in the filling? Or do you bake it only with the filling and merenge?
Thanks!
Hi Martha,
This will depend on the pie recipe, but yes typically you pre-bake the crust with some pie weights inside (dry beans also work), then fill the pie, then bake again or refrigerate depending on the type of pie.
Is this one pie crust bottom? Top and bottom?
This makes just 1 crust. If you want a top and bottom, just double the recipe (you can adjust the servings section – it says “serves 8” currently, as in if you were to cut the pie crust into 8, so just make it 16 instead and it will duplicate the ingredients for you).